
Headless architecture is gaining popularity and at Digital Polygon we decided to explore it by relaunching www.digitalpolygon.com with a modern headless architecture. Today, I'm going to share the experience and lessons we learned.
What is Headless?
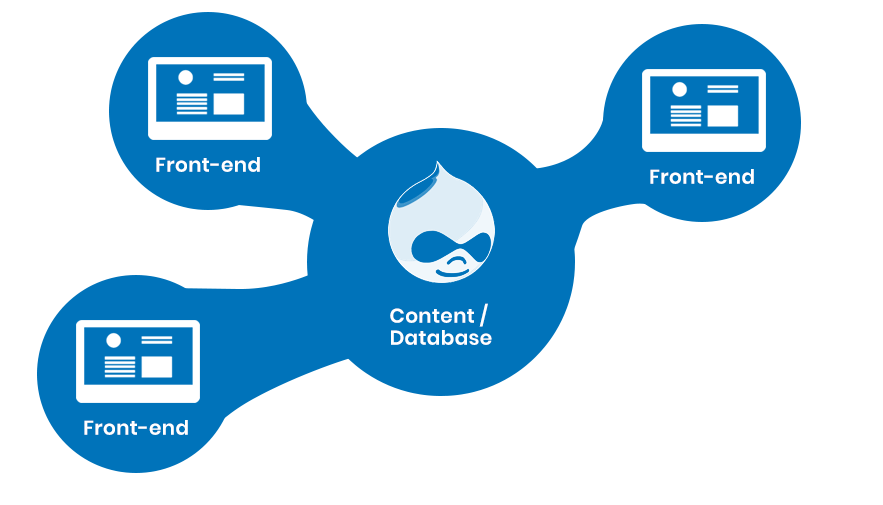
A body without a head is considered headless by definition. I like to put it in a different light: a body capable of wielding numerous heads. The OTT platforms are an excellent illustration of how headless works. We begin viewing a movie on a website and can continue watching it on a mobile app. That is the power of headlessness. Multiple targets are served by a single source of information. One body with the ability to wield numerous heads.
A headless architecture in the web refers to a back-end system that exposes data via APIs that may be accessed by other platforms. There are several classic content management systems (CMS) available for managing a website's content. We chose Drupal for its flexibility and scalability.
What is headless Drupal?
Drupal without its front-end layer. In other words, Drupal is used as a back-end content repository. The front-end can be served by any of latest technologies. We chose Next.js as our front-end stack for www.digitalpolygon.com.
In this article, I’m going to cover
- How to setup headless Drupal with DDEV
- How to setup Next.js front-end using DDEV
- How to connect Next.js with Drupal
First thing’s first, pick a solid starter kit that will make your task simple. Both Chapter Three and Pantheon did some incredible work to construct some starter kits:
To rebuild www.digitalpolygon.com, we decided to use Pantheon’s Next Drupal Starter, which includes integration for Lando. Although the Lando integration is excellent, we integrated DDEV into the starter kit because it is our team’s preferred local development tool.
To set up Drupal you can follow this DDEV quick start guide.
Before proceeding further, make sure you have a working Drupal instance at - https://drupal-starter.ddev.site/
Let's go on to the exciting part, which is configuring the Next.JS with DDEV.
Setup Next.js Front-end with DDEV
These instructions presume that you have installed DDEV locally and have copied Pantheon's starter kit to a folder called "next-drupal-starter."
- Go to your front-end application directory i.e.
cd next-drupal-starter - Run
ddev config- Enter project name
- Enter docroot location
- Enter
phpas your project type. At the time of writing this blog, DDEV doesn’t support any other project type.
- This will install DDEV in your project
- Next, edit
config.yamlfile location in.ddevdirectory and update the following:- Set omit_containers:
['db', 'dba']- We don’t need database containers because databases will be managed with Drupal BE.
- Set
disable_settings_managementtotrue- We don’t need Drupal settings here.
- Set omit_containers:
At the end of above steps your config.yaml file should look like this
name: next-drupal-starter
type: php
docroot: ""
php_version: "7.4"
webserver_type: nginx-fpm
router_http_port: "80"
router_https_port: "443"
xdebug_enabled: false
additional_fqdns: []
nfs_mount_enabled: false
mutagen_enabled: false
use_dns_when_possible: true
composer_version: "2"
web_environment: []
nodejs_version: "16"
omit_containers: ['db', 'dba']
disable_settings_management: true
Ok, so far so good, you have setup DDEV containers but your application isn’t running yet. To get a functioning application, we must take a few additional steps.
- By default, Next.js runs on port 3000, so we must map port 80 of the local machine to port 3000 of the DDEV web container. There are several options.
- Port mapping can be done using
docker-compose.*.yamlas per this example - In nginx, create a virtual host. Since we require more than just port mapping, we are employing the vhost technique.
- Port mapping can be done using
Make the following changes to the next-drupal-starter.conf file located in the .ddev/nginx_full directory.
server {
   server_name next-drupal-starter.ddev.site;
   listen 80;
   location / {
       proxy_set_header   X-Forwarded-For $remote_addr;
       proxy_http_version 1.1;
       proxy_set_header Upgrade $http_upgrade;
       proxy_set_header Connection "Upgrade";
       proxy_set_header Host $http_host;
       proxy_pass http://127.0.0.1:3000;
   }
}- Restart DDEV
- We’re not quite there yet, but at this time you will have a working Next.js instance. To see your site, execute the
ddev yarn devcommand - You may now access the website at http://next-drupal-starter.ddev.site/
You can't close the terminal since we need to manually run ddev yarn dev. We want it to operate in the background to correct this. We'll check the pm2 package.
Since it's a node package we will have to update our docker image to include this package. To do this
- Create a DockerFile in the
.ddev/web-builddirectory with following content:
# You can copy this Dockerfile.example to Dockerfile to add configuration
# or packages or anything else to your webimage
  ARG BASE_IMAGE
  FROM $BASE_IMAGE
  RUN npm install --global pm2
- After installing pm2, we need to run the Next.js js application using pm2. DDEV provides hooks to execute commands after defined actions. So, we will use the
post-starthook. Update.ddev/config.ymlwith below
hooks:

    post-start:

      - exec: yarn install

      - exec: pm2 start "yarn dev"
- Restart DDEV
- Visit http://next-drupal-starter.ddev.site/
Both the front-end and the back-end applications should now be operating in their isolated DDEV containers. We must create a connection between the front-end and back-end web containers so our front-end application can communicate with the back-end in order to access APIs.
Let’s create a custom Docker compose file to establish a link. Create a .ddev/docker-compose.connect-drupal.yaml in the front-end application with the following content:
version: '3.6'

services:

  web:

    external_links:

      - ddev-router:drupal-starter.ddev.site
Congratulations, after this front-end DDEV setup is complete!
Let’s configure Drupal to be headless.
Back-end Drupal Setup for Decoupled
Headless Profile
Install the Pantheon Decoupled Profile
- This will install Pantheon Decoupled which will create a preview site and oAuth consumer.
- Preview site can be used to preview your changes i.e. how your changes would look in front-end
- oAuth consumer will be used to connect front-end with back-end.
Oauth Consumer
You can either utilize the current oAuth client given by above profile, or make another one. This consumer is used in API calls from Next.js to Drupal.
To create a new consumer
- Go to /admin/config/services/consumer/add
- Enter
- Label
- User
- Secret
- Scope
- Save the consumer
Make sure to note the UUID & Secret of the above entity. They will be used in front-end configurations.
Preview Site
Similar to oAuth customers, you can choose to use an example preview site created by the above decoupled profile. Alternatively, you can also create a new preview site
To create a new site:
- Go to /admin/structure/dp-preview-site
- Enter
- Label
- URL - https://example.site/api/preview - Replace example.com with your front-end site. In our case it would be - http://next-drupal-starter.ddev.site/api/preview
- Secret
- Select Next.js as preview type
- Save
Please make sure to note the secret. It will be used in front-end configurations.
After configuring Drupal for decoupled applications, the final step is connecting the front-end with the back-end.
Connect Next.js with Drupal Back-end
- Goto your front-end application root
- You will see a
.env.examplefile - Copy it to
.env.development.localand update following values:
  BACKEND_URL= https://drupal-starter.ddev.site
  IMAGE_DOMAIN= drupal-starter.ddev.site
  # Used to set the debug mode for the DrupalState store(s)
  # If not set, debug mode for the store(s) is set to false
  DEBUG_MODE=
  # this value can also be set in the command line
  # before running commands for example
  # FRONTEND_URL=example.com npm run build
  FRONTEND_URL=  https://next-drupal-starter.ddev.site
  # These variables are needed to enable Preview
  PREVIEW_SECRET= Use secret from preview site configuration
  CLIENT_ID= Use UUID of oAuth consumer created
  CLIENT_SECRET= Use Secret of oAuth consumer created
Visit Pantheon Decoupled Kit Next Drupal Starter for more information.
After configuring above environment variables. Run ddev restart in the front-end application.
And Ta-da! Both of your sites are ready, and are talking to each other.